Fuel Tank Restoration Guide
This guide will show you how I turned my 17 year old fuel tank into one that looked a day old!

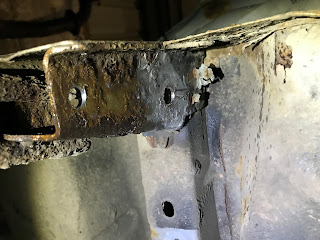
Once the subframe assembly is out of the way, the fuel tank can be removed!
- Remove the fuel filler tube and return from within the boot.
- Disconnect fuel pump electronics and fittings from within the cabin (hidden under parcel shelf).
- Not necessary for everyone, remove fuel filter with fuel lines.
- 4 Bolts hold the fuel tank to the chassis, the fuel tank can now be removed!
Once the tank is removed, strip it to the bare fuel tank. This includes removing fuel pump, roll-over valve, rubber mounting tabs, foam strip, and the probably very rusty heat shield.
You'll probably snap a few bolts removing the heat shield, these can be easily drilled out once it is off or leave them flush and pretend they were never there! I will not be utilizing the heat shield anymore so I did not waste time drilling them out.

All surface rust was basically removed in this process, for the bits that remained I coated them with a rust converter.
I masked off the open holes and fuel pump cover ready for paint. Fun fact, engine stands double up as painting jigs!
A quick wipe over with acetone and it is ready for paint.

I used UPol Gravitex stonechip to paint the fuel tank. It is a rubberized, stone chip resistant, fuel resistant coating which comes with its own paint gun in the kit, happy days! I am using the Gravitex for the full underside of the chassis, it is brilliant stuff!
I sprayed it using the recommend air pressure give or take a few PSI. 3 fairly heavy coats and the spraying was done. I could have used a primer to further protect the fuel tank however the protection offered from the Gravitex is plenty good enough!
Before it dried completely, I removed the masking tape. This prevents the paint pealing off or chipping!
The finished product is a brand new looking fuel tank! I left the Gravitex dry for a few hours before removing it off the engine crane.


Good as new!!
If this is the last step of your restoration, you can now refit the tank in the reverse order to how you took it off.
The brackets and fixtures could probably do with a bit of paint, it varies from car to car. I will most likely get mine zinc coated for long lasting protection, but paint will work just as well!
Thanks for that :D I will be restoring my fuel tank prior to refitting and there are a few good pointers here :D
ReplyDeleteThanks Yeti! Good luck with your restoration
Delete